Alt is the altitude of re-entry interface, which is the point where the atmosphere begins to have an effect on your trajectory. This is quite a bit above 40k. The standard for Earth is 120k, but can be set as low as 90k. Ant is anticipation, which is the expected angular distance you will travel AFTER crossing re-entry interface. If you have Alt = 120k, this will be closer to 60, perhaps as much as 90. Since I don't use the full auto re-entry AP, I can't be certain - you will have to experiment a bit to find out.
Even then, this will only be repeatable if you always de-orbit at the same altitude. If you de-orbit from a higher altitude, your velocity will be higher and the Ant will need to be increased a bit. It also varies with vessel mass (ie, fuel load, payload, etc), more mass requires more Ant.
If your temps get too high, you need to LOWER your AoA, not increase it. Lowering the AoA will provide more lift, thus slowing your descent rate. The secret to managing heat is to manage the descent rate (VS in SurfaceMFD). You want a descent rate of about -80m/s below 65k alt. When you increased your AoA to 60 degrees and temps went down, that means you had already reduced your velocity enough to be below max heat flux, OR your VS was well above -80m/s. Lowering the AoA can cause a temporary spike in upper hull temps so don't wait until the last moment to lower the AoA.
If you de-orbit 180 degrees from target, you will want a PeA of about 50k after the burn, coming in from the ISS (about 375k alt) this will give you a ReA of about 0.8 degrees. Your AoA will usually vary between 35 and 40 degrees, and you will "bounce" up and down a bit - but won't overheat. De-orbiting about 17.5M from the target will reduce the "bouncing", but you'll need to watch the heat more.
I recommend checking this tutorial out:
[ame="http://www.orbithangar.com/searchid.php?ID=3428"]Tutorial: Concepts for atmospheric reentry[/ame]
This will help you understand what's going on so you can anticipate the re-entry better.
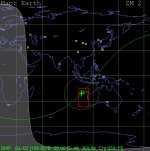
Make sure you're pointed RETROGRADE, and burn until (on Aerobrake MFD) you see a little square near the center of the grid. (This little square is the point where you're orbit will hit the ground. This INCLUDES atmosperic drag.)
Actually, at this point, aerodynamic drag is NOT considered, and this is a purely ballistic prediction. Atmospheric effects (drag and lift) aren't considered until the vessel is below 200k alt (at least this was the case in Orbiter 2006, this may have changed with the new atmo model in 2010. Even if it is, it's calculating this based on your current AoA of -180 degrees and bank of 90 degrees, and won't be accurate.) Just burn until your PeA is about 50k, you'll be fine.


 )
)") )
)