- Joined
- Oct 16, 2007
- Messages
- 6,586
- Reaction score
- 140
- Points
- 138
- Location
- Houston
- Website
- youtube.com
Making a good film is never a quick or easy process. Before you can make a good film, you've got to come up with an idea - be it a full blown storyline or maybe a compilation of shots made into a tribute of sorts. I've found my best ideas come at a totally unexpected time when I'm not even thinking about making a movie. Other times listening to music has inspired ideas. You must free your creative mind to open the door to new ideas. This can be a lot harder than it sounds, especially if you've already made quite a few films. Everyone has their own way of doing this, you must find what works for you.
Once you have an idea for a film you can start planning the music you want to use. This of course is personal preference, but I recommend picking something tasteful for the topic in which you're filming. I like to pick the music before I do any filming. This way you can plan your shots around the music. I recommend using some sort of notebook to keep notes during the production process. Write down any preliminary ideas you may have for the film from camera angles, effects, etc. If you're making a detailed movie with a storyline and voice acting, then you will obviously want to write this before filming anything. Sometimes however it's easier to make a storyline out of shots you've already filmed. If you have the idea, but can't come up with a detailed storyline before filming, then try this method.
Shooting the movie is a very critical part in the success of it. There are several things to consider. First is the lighting. Sunset and sunrise shots always make for beautiful lighting. I find that midday is the worst lighting, everything is just too bright. It's easier to get realistic looking shots with lower, more subtle lighting. Next is the camera angles. Try to come up with new and unique angles if you can. Watch any movie and pay attention to the camera angles. This will help you come up with great shots yourself. Close up shots typically appear more dramatic and give a sense of size and aw, where wide angle shots give a sense of openness. I like to use a combination of both, but tend to use closer angles more. For Orbiter films be sure to get flyby shots since it can be difficult to see any movement otherwise. You'll want to shoot lot's of relatively short cuts. Using lot's of different angles in the film adds so much to the end result.
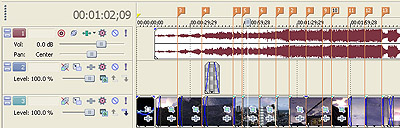
Screen shot of Sony Vegas 8 Pro showing the use of markers
So, you've got some filming done, but you're not sure how it looks yet. Before you get carried away trying to film the whole movie, look at all the shots you've gotten so far. Delete the ones you don't like, then head into your video editor and start piecing the shots you kept togeher. I like to place the background music in the editor first thing. I'll then add the video under it in the second channel. If you're using Vegas or similar pro editing suite, then you can place markers at key points in the song where you know you want a transition from one shot to another. I will often do some of this before adding any video. Add your shots one at a time and play with the arrangement until you get something that you think looks good. From there you can watch it a few times and take notes on the things you feel are missing or any ideas you get for changes. I say to take notes because as you're watching the preview you will find lot's of things to fix or change. If you don't write it all down you will forget since it often takes some time to make those changes.
Once I've gotten this far I generally have a pretty good idea of any remaining shots I want in the film and will go ahead and get everything shot. Once you get everything filmed it's just a matter of completing the movie in the editor, but be prepared to film additional filler shots or replacement shots. Treat every scene like your baby to make a really polished film. If you don't like how a shot looks once you get it in the editor, go back and re-shoot it. It's a tedious process, but necessary if you want your film to be a cut above the rest. During this period I spend a lot of time going between filming and editing. When I am editing the film I tend to jump around the way an artist will while drawing. It helps to get some transitions and effects done during this time to give you a better sense of the finished project. Before moving on to the final editing process I like to add any sound effects I'll be using in the video at this stage.
The final editing process is done after you're totally satisfied with every shot in the film. This time is spent perfecting the transitions, cropping, effects, and post process filters. Every shot should be cropped. I find a wide screen crop creates a more cinematic effect as if you're watching it in a movie theater. Cropping should also be used to hide any text or other objects that affect the realism of the shot. You can make some shots more dramatic by cropping the object off center. Shifting the viewers focus is an easy way to really improve your film. Camera shake effects can also be done by cropping the shot on a frame by frame basis. This is very time consuming, but if done right really adds a professional touch to your film. After I am happy with the cropping and any camera shake effects I move on to transitions and post process filters. Transitions between shots are critical for a fluid feel to the movie. Use what transitions your editor offers, but remember often times a simple fade into another shot is very pleasing. If the music is slow a long fade between the shots looks nice, where faster music looks better with quick - flashy type transitions. With the transitions completed I will finally add post process filters. By this I mean making use of color adjustment, contrast, and lighting filters to give the movie a more realistic look. I add these filters to EACH shot individually since every shot is unique and requires different settings. This part is also very time consuming, but as you have seen with my films it really adds a lot to the finished result.
Is it time to release it? Render the film and watch it over and over. Sleep on it a day or two and watch it again. Take notes of anything you might want to change or experiment with. If you decide to make several changes I would recommend saving your previous project separately so if you don't like the changes you can go back to the previous version you were happier with a lot easier. Take the time to include credits as well. If you've already taken the time to make the film this good, you should make some decent credits. Once you're totally happy with the film it's time to release it. Of course by then, you're sick of watching it - while everyone else is just seeing it, you know every shot like the back of your hand.

Completed view of my film 'Orbiter 2048' in Sony Vegas
I hope this was helpful to those interested in making your own machinima films and I look forward to seeing your films! Thanks for reading, feel free to leave any comments below. :thumbup:
Once you have an idea for a film you can start planning the music you want to use. This of course is personal preference, but I recommend picking something tasteful for the topic in which you're filming. I like to pick the music before I do any filming. This way you can plan your shots around the music. I recommend using some sort of notebook to keep notes during the production process. Write down any preliminary ideas you may have for the film from camera angles, effects, etc. If you're making a detailed movie with a storyline and voice acting, then you will obviously want to write this before filming anything. Sometimes however it's easier to make a storyline out of shots you've already filmed. If you have the idea, but can't come up with a detailed storyline before filming, then try this method.
Shooting the movie is a very critical part in the success of it. There are several things to consider. First is the lighting. Sunset and sunrise shots always make for beautiful lighting. I find that midday is the worst lighting, everything is just too bright. It's easier to get realistic looking shots with lower, more subtle lighting. Next is the camera angles. Try to come up with new and unique angles if you can. Watch any movie and pay attention to the camera angles. This will help you come up with great shots yourself. Close up shots typically appear more dramatic and give a sense of size and aw, where wide angle shots give a sense of openness. I like to use a combination of both, but tend to use closer angles more. For Orbiter films be sure to get flyby shots since it can be difficult to see any movement otherwise. You'll want to shoot lot's of relatively short cuts. Using lot's of different angles in the film adds so much to the end result.
Screen shot of Sony Vegas 8 Pro showing the use of markers
So, you've got some filming done, but you're not sure how it looks yet. Before you get carried away trying to film the whole movie, look at all the shots you've gotten so far. Delete the ones you don't like, then head into your video editor and start piecing the shots you kept togeher. I like to place the background music in the editor first thing. I'll then add the video under it in the second channel. If you're using Vegas or similar pro editing suite, then you can place markers at key points in the song where you know you want a transition from one shot to another. I will often do some of this before adding any video. Add your shots one at a time and play with the arrangement until you get something that you think looks good. From there you can watch it a few times and take notes on the things you feel are missing or any ideas you get for changes. I say to take notes because as you're watching the preview you will find lot's of things to fix or change. If you don't write it all down you will forget since it often takes some time to make those changes.
Once I've gotten this far I generally have a pretty good idea of any remaining shots I want in the film and will go ahead and get everything shot. Once you get everything filmed it's just a matter of completing the movie in the editor, but be prepared to film additional filler shots or replacement shots. Treat every scene like your baby to make a really polished film. If you don't like how a shot looks once you get it in the editor, go back and re-shoot it. It's a tedious process, but necessary if you want your film to be a cut above the rest. During this period I spend a lot of time going between filming and editing. When I am editing the film I tend to jump around the way an artist will while drawing. It helps to get some transitions and effects done during this time to give you a better sense of the finished project. Before moving on to the final editing process I like to add any sound effects I'll be using in the video at this stage.
The final editing process is done after you're totally satisfied with every shot in the film. This time is spent perfecting the transitions, cropping, effects, and post process filters. Every shot should be cropped. I find a wide screen crop creates a more cinematic effect as if you're watching it in a movie theater. Cropping should also be used to hide any text or other objects that affect the realism of the shot. You can make some shots more dramatic by cropping the object off center. Shifting the viewers focus is an easy way to really improve your film. Camera shake effects can also be done by cropping the shot on a frame by frame basis. This is very time consuming, but if done right really adds a professional touch to your film. After I am happy with the cropping and any camera shake effects I move on to transitions and post process filters. Transitions between shots are critical for a fluid feel to the movie. Use what transitions your editor offers, but remember often times a simple fade into another shot is very pleasing. If the music is slow a long fade between the shots looks nice, where faster music looks better with quick - flashy type transitions. With the transitions completed I will finally add post process filters. By this I mean making use of color adjustment, contrast, and lighting filters to give the movie a more realistic look. I add these filters to EACH shot individually since every shot is unique and requires different settings. This part is also very time consuming, but as you have seen with my films it really adds a lot to the finished result.
Is it time to release it? Render the film and watch it over and over. Sleep on it a day or two and watch it again. Take notes of anything you might want to change or experiment with. If you decide to make several changes I would recommend saving your previous project separately so if you don't like the changes you can go back to the previous version you were happier with a lot easier. Take the time to include credits as well. If you've already taken the time to make the film this good, you should make some decent credits. Once you're totally happy with the film it's time to release it. Of course by then, you're sick of watching it - while everyone else is just seeing it, you know every shot like the back of your hand.
Completed view of my film 'Orbiter 2048' in Sony Vegas
I hope this was helpful to those interested in making your own machinima films and I look forward to seeing your films! Thanks for reading, feel free to leave any comments below. :thumbup:
") ] and thanks for posting your insights.
] and thanks for posting your insights.